Creating an Event Function using a container image built with C#
For general details about how to use a container image to create and execute an event function, see Creating an Event Function Using a Container Image and executing the Function.
This chapter introduces how to create an image using C# and perform local verification for event functions.
Note
You need to implement an HTTP server in the image listening to port 8000 to receive requests.
Following request path is required:
POST /invoke is the function execution entry where trigger events are processed.
Following request path is optional:
POST /init is the function initialization entry where you can perform initialization operations such as loading dependencies and preparing runtime environment. This entry is optional, and you can choose to implement it based on your needs. If you do not implement this entry, FunctionGraph will directly execute the function without initialization.
Step 1: Create the Project
See: Container Event Timer Sample for an example of creating an event function using a container image built with C#.
Step 2: Build the Container Image
Build and verify the image locally
1. Build the image
Build the image either using docker build or the Makefile target docker_build:
Run the following command in the project root folder to build the image:
docker buildx build \
   --platform linux/amd64 \
   --file Dockerfile \
   --tag custom_container_event_timer_csharp:latest .
Run the following command in the project root folder to build the image:
make docker_build
2. Run the image locally
Run the image either using docker run or the Makefile target docker_run_local:
Run the following command in the project root folder to run the image:
docker container run --rm \
  --platform linux/amd64 \
  --publish 8000:8000 \
  --name custom_container_event_timer_csharp \
  custom_container_event_timer_csharp:latest
Run the following command in the project root folder to run the image:
make docker_run_local
3. Test the image locally
Test the image using the Makefile target test_local - run the following command in a new terminal to test the image:
make test_local
You should see output similar to the following:
Processed event: {"version":"v1.0","time":"2023-06-01T00:30:00+00:00","trigger_type":"TIMER","trigger_name":"Timer_001","user_event":"{\"message\": \"timer triggered event\", \"topic\":\"test\"}"}, RequestId: e1817952-1c91-4779-adaf-459804910e30
Step 3: Upload the Container Image to SWR (SoftWare Repository for Container)
For details on SWR (SoftWare Repository for Container), see:
Prerequisites
SWR instance created.
Credentials for SWR created.
Upload the image to SWR
To upload the container image to SWR, following values are needed:
Parameter |
Description |
|---|---|
OTC_SDK_PROJECTNAME |
Your project name.
To obtain this, see: Obtaining a Project ID
in API usage guide but use the project name instead of the project ID.
|
OTC_SDK_AK |
Your Access Key |
OTC_SWR_LOGIN_KEY |
The login key for SWR.
For details see: Obtaining a Long-Term Docker Login Command
in the Software Repository for Container user manual.
It can be generated using the access key ${OTC_SDK_AK} and secret key ${OTC_SDK_SK} as follows:
|
OTC_SWR_ENDPOINT |
SWR endpoint, e.g. swr.eu-de.otc.t-systems.com |
OTC_SWR_ORGANIZATION |
Your SWR organization name |
IMAGE_NAME |
The name of your container image |
- Set the environment variables:
export OTC_SDK_PROJECTNAME=<your_project_name>
export OTC_SDK_AK=<your_access_key>
export OTC_SDK_SK=<your_secret_key>
export OTC_SWR_LOGIN_KEY=$(printf "${OTC_SDK_AK}" | \
        openssl dgst -binary -sha256 -hmac "${OTC_SDK_SK}" | \
        od -An -vtx1 | sed 's/[ \n]//g' | sed 'N;s/\n//')
export OTC_SWR_ENDPOINT=swr.eu-de.otc.t-systems.com
export OTC_SWR_ORGANIZATION=<your_swr_organization>
export IMAGE_NAME=custom_container_event_example
Upload the image to SWR either using shell commands or the Makefile target docker_push:
Run the following commands in the container-event-timer folder to upload the image to SWR:
docker login -u ${OTC_SDK_PROJECTNAME}@${OTC_SDK_AK} -p ${OTC_SWR_LOGIN_KEY} ${OTC_SWR_ENDPOINT}
docker tag ${IMAGE_NAME}:latest ${OTC_SWR_ENDPOINT}/${OTC_SWR_ORGANIZATION}/${IMAGE_NAME}:latest
docker push ${OTC_SWR_ENDPOINT}/${OTC_SWR_ORGANIZATION}/${IMAGE_NAME}:latest
Run the following command in the container-event-timer folder to upload the image to SWR:
make docker_push
Step 4: Terraform Deployment
For the configuration needed for Terraform deployment, see Prepare the Terraform environment.
To deploy the function (including a test event) using Terraform adapt the MakefileTF and the Terraform configuration files in the sample folder according to your needs and execute the following commands in the project root folder:
make -f MakefileTF tf_apply
To update code changes use:
make -f MakefileTF update_image
Note
To clean up the resources created by Terraform, execute the following command in the project root folder:
make -f MakefileTF tf_destroy
Step 5: View the Execution Result
Click Test and view the execution result on the right.
You should see output similar to the following:
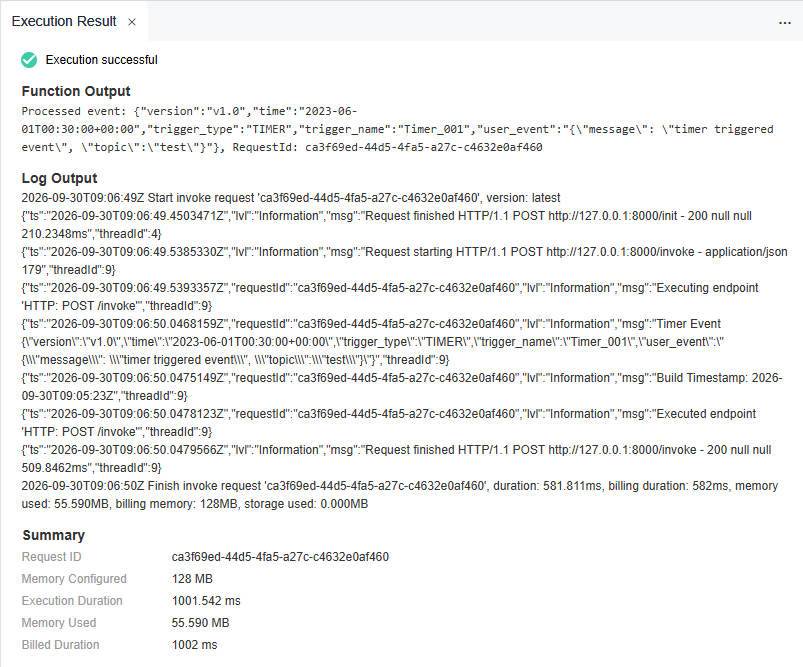
The execution result contains the following sections:
The Function Output section displays the function’s return value.
The Log Output section displays the logs generated during function execution.
Note
This page displays a maximum of 2K logs.
The Summary section displays key information from the Log.