Building FunctionGraph HTTP Functions with Go from scratch
Introduction
This chapter describes how to deploy services on FunctionGraph using Go.
HTTP functions do not support direct code deployment using Go in web console.
This section uses binary conversion as an example to describe how to deploy Go programs on FunctionGraph.
This sample uses the go-restful framework to implement the HTTP function.
Full sample can be found in samples-doc/buildinghttpfunction.
Procedure
Building a code package
Create the source file main.go. The code is as follows:
// main.go
package main

import (
	"fmt"
	"net/http"

	"github.com/emicklei/go-restful"
)

func registerServer() {
	fmt.Println("Running a Go Http server at localhost:8000/")

	ws := new(restful.WebService)
	ws.Path("/")

	ws.Route(ws.GET("/hello").To(Hello))
	c := restful.DefaultContainer
	c.Add(ws)
	fmt.Println(http.ListenAndServe(":8000", c))
}

func Hello(req *restful.Request, resp *restful.Response) {
	resp.Write([]byte("nice to meet you"))
}

func main() {
	registerServer()
}
In main.go, an HTTP server is started using port 8000, and an API whose path is /hello is registered.
When the API is invoked, “nice to meet you” is returned.
Create the go.mod file to manage the dependencies of the project.
The content is as follows:
Compiling and packaging
To ease building and packaging, create a Makefile in the project root directory like the following:
HANDLER_NAME=go-http-demo

build:
	GOARCH=amd64 GOOS=linux CGO_ENABLED=0 go build -o target/$(HANDLER_NAME) src/main.go

zip:
	# Create bootstrap file pointing to the handler binary
	@echo "/opt/function/code/$(HANDLER_NAME)" > target/bootstrap

	# Zip all files in target directory
	cd target && zip -r ../deploy.zip .

clean:
	rm -f deploy.zip
	rm -rf target

all: clean build zip

.PHONY: build zip clean all
The Makefile automates the build process for your Go FunctionGraph HTTP function.
You can run the make build command in the project root directory to compile your function code and generate the executable file named go-http-demo in the target directory.
The make zip command creates a deployment package named deploy.zip that contains the executable file and a bootstrap file.
The bootstrap file is required by FunctionGraph to identify the entry file of the function.
/opt/function/code/go-http-demo
To ease building and packaging, create a build.cmd file in the project root directory like the following:
rem #############################################################
rem # Build script for Golang HTTP Function
rem # for Linux target on Windows
rem #############################################################

rem set visibility of environment changes to local only
SETLOCAL

rem Set the following parameters to the corresponding value of Linux
set GOARCH=amd64
set GOOS=linux
set CGO_ENABLED=0
set GO111MODULE=on

rem set handler name
set HANDLER_NAME=go-http-demo

rem create target_win folder if not exists
if not exist "target_win" md "target_win"

rem build the Go HTTP function in target_win folder
go build -o target_win/%HANDLER_NAME% src/main.go

rem create bootstrap file in target_win folder
echo /opt/function/code/%HANDLER_NAME% > .\target_win\bootstrap

rem package the target_win folder to a zip file
tar.exe -c -a -f go-http-demo.zip -C target_win *
Run the build.cmd script in the project root directory to compile your function code and generate the executable file named go-http-demo and the bootstrap file in the target_win directory.
The bootstrap file is required by FunctionGraph to identify the entry file of the function.
bootstrap file¶/opt/function/code/go-http-demo
The script also creates a deployment package named go-http-demo.zip in the project root directory using the Windows tar.exe command.
You can then upload this deployment package to FunctionGraph.
Creating an HTTP function and uploading code
Create an HTTP function and upload the go-http-demo.zip package. For details, see Creating an HTTP Function
Invocation test using console and test event
In FunctionGraph console, you can create a test event to test the HTTP function.
The following is an example test event:
{
    "body": "",
    "requestContext": {
        "apiId": "bc1dcffd-aa35-474d-897c-d53425a4c08e",
        "requestId": "11cdcdcf33949dc6d722640a13091c77",
        "stage": "RELEASE"
    },
    "queryStringParameters": {
        "responseType": "html"
    },
    "httpMethod": "GET",
    "pathParameters": {},
    "headers": {
        "accept-language": "q=0.5,en-US;q=0.3,en;q=0.2",
        "accept-encoding": "gzip, deflate, br",
        "x-forwarded-port": "443",
        "x-forwarded-for": "103.218.216.98",
        "accept": "text/html,application/xhtml+xml,application/xml;q=0.9,*/*;q=0.8",
        "upgrade-insecure-requests": "1",
        "host": "host",
        "x-forwarded-proto": "https",
        "pragma": "no-cache",
        "cache-control": "no-cache",
        "x-real-ip": "103.218.216.98",
        "user-agent": "Mozilla/5.0 (Windows NT 6.1; Win64; x64; rv:57.0) Gecko/20100101 Firefox/57.0"
    },
    "path": "/hello",
    "isBase64Encoded": true
}
The preceding example test event simulates an HTTP GET request to the /hello API of the HTTP function.
When you use this test event to test the HTTP function, the function returns the following response:
{
  "body": "bmljZSB0byBtZWV0IHlvdQ==",
  "headers": {
      "Content-Length": [
          "16"
      ],
      "Content-Type": [
          "text/plain; charset=utf-8"
      ],
      "Date": [
          "Thu, 23 Oct 2025 14:08:57 GMT"
      ]
  },
  "statusCode": 200,
  "isBase64Encoded": true
}
The body field contains the Base64-encoded string of “nice to meet you”.
The statusCode field indicates that the request is processed successfully.
Creating an APIG (Dedicated) trigger
Create an APIG (dedicated) trigger by referring to Using an APIG Trigger. Set: - Security Authentication to None for debugging - Environment to RELEASE - Protocol to HTTPS. - Method to ANY.
For details, see Using an APIG Dedicated Trigger
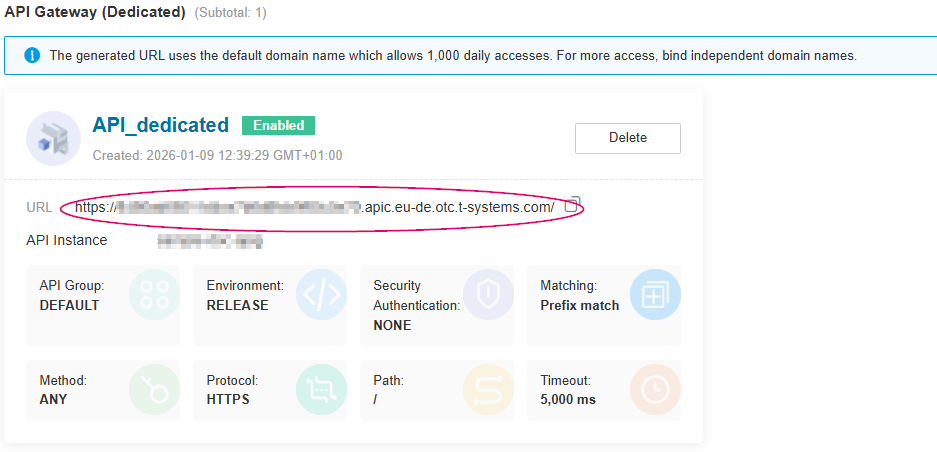
Trigger settings
Invocation test using APIG trigger and browser
Copy the URL of the APIG trigger and add /hello to the address box of the browser.
The following information is displayed:

Result in browser
Deploy the HTTP Function using Terraform
For details on how to deploy using Terraform, see Deploying a HTTP Function using Terraform.