Setting up the PHP project for event functions
The following examples assumes that you have PHP 8.3 installed you are using composer as the package manager and linux.
Creating a PHP project
Project structure
A minimal PHP FunctionGraph project is typically structured as follows:
/project-root
 ├─ dependencies      # PHP third-party dependencies (optional), created by composer (vendor directory)
 ├─ src
 |  └─ index.php
 ├─ composer.json
 └─ Makefile
Note
The dependencies directory is where composer will install third-party PHP packages for the project. Normally this directory is named vendor by default, but in this project, it is named dependencies as specified in the composer.json file.
If using FunctionGraph dependencies, those will be unzipped in the $RUNTIME_CODE_ROOT/vendor directory.
Sample code
<?php

require __DIR__ . '/../dependencies/autoload.php';

use Brick\DateTime\LocalDate;
use Brick\DateTime\TimeZone;

function initializer($context) {
    $logger = $context->getLogger();
    $logger->info("Function name: " . $context->getFunctionName());

    return;
}

function handler($event, $context) {
    $logger = $context->getLogger();
    $logger->info("Function name: " . $context->getFunctionName());

    $logger->info('Local date: ' . LocalDate::now(TimeZone::utc()));

    return [
        "statusCode" => 200,
        "isBase64Encoded" => false,
        "body" => json_encode($event),
        "headers" => [
            "Content-Type" => "application/json"
        ]
    ];
}
composer.json
The composer.json file is used to manage the dependencies of a PHP project. The following is a sample composer.json file:
{
      "name": "opentelekomcloud-community/scratch-event-project",
      "description": "sample PHP project for FunctionGraph",
      "type": "project",
      "license": "Apache-2.0",
      "require": {
        "brick/date-time": "^0.9.0"
      },
      "archive": {
        "exclude": [
          "Makefile"
        ]
      },
      "config": {
        "archive-format": "zip",
        "sort-packages": true,
        "vendor-dir": "dependencies"
      }
    }
Makefile
The Makefile is used to automate the build and deployment process of a PHP project. The following is a sample Makefile:
# create a zip package of the function code for deployment
# based on composer.json archive settings
create_package:
	# install production dependencies without development dependencies
	composer install --no-dev --prefer-dist
	# create a code.zip archive of the production dependencies
	composer archive --format=zip --file=code
	# reinstall all dependencies including development dependencies
	composer install

.PHONY: create_package
Deploying to FunctionGraph
Create Zip
To upload the function code to FunctionGraph, you need to create package of the project.
The directory structure of the zip package should be as follows:
/code.zip
 ├─ dependencies           # PHP third-party dependencies (optional)
 |  └─ ...
 ├─ src
 |  └─ index.php           # .php handler file (mandatory)
 └─ composer.json          # PHP project management file (optional)
You can use the following make target to create the package, which will include the dependencies listed in the composer.json file:
make create_package
Create FunctionGraph function in console
Log in to the FunctionGraph console.
Click Create Function and select Create from scratch.
In Basic Information:
“FunctionType”: Event Function.
“Region”: select the region where you want to create the function.
“Function Name**: enter a php_sample as name for the function.
“Enterprise Project**: select default.
“Runtime**: select the PHP runtime version PHP 8.3.
“Agency”: select Use no agency
Click Create Function.
Upload the created code.zip file to the function by clicking Upload > Local ZIP.
The uploaded code will be automatically deployed on the FunctionGraph console. If you have modified the code, click Deploy again.
Modify the function handler:
Click Configuration > Basic Settings.
In the Handler field, enter the handler src/index.handler.
Click Save.
Modify the initializer (if needed):
Click Configuration > Lifecycle.
enable Initialization
In the Function Initializer field, enter the initializer src/index.initializer.
Click Save.
Testing the function
On the Code tab, click Test. In the Configure Test Event dialog box, create from Blank Template and set as:
{
   "key": "value"
}
Click Create to save the test event.
Click Test to test the function.
the Execution Result window is displayed on the right. You can check whether the function is executed successfully.
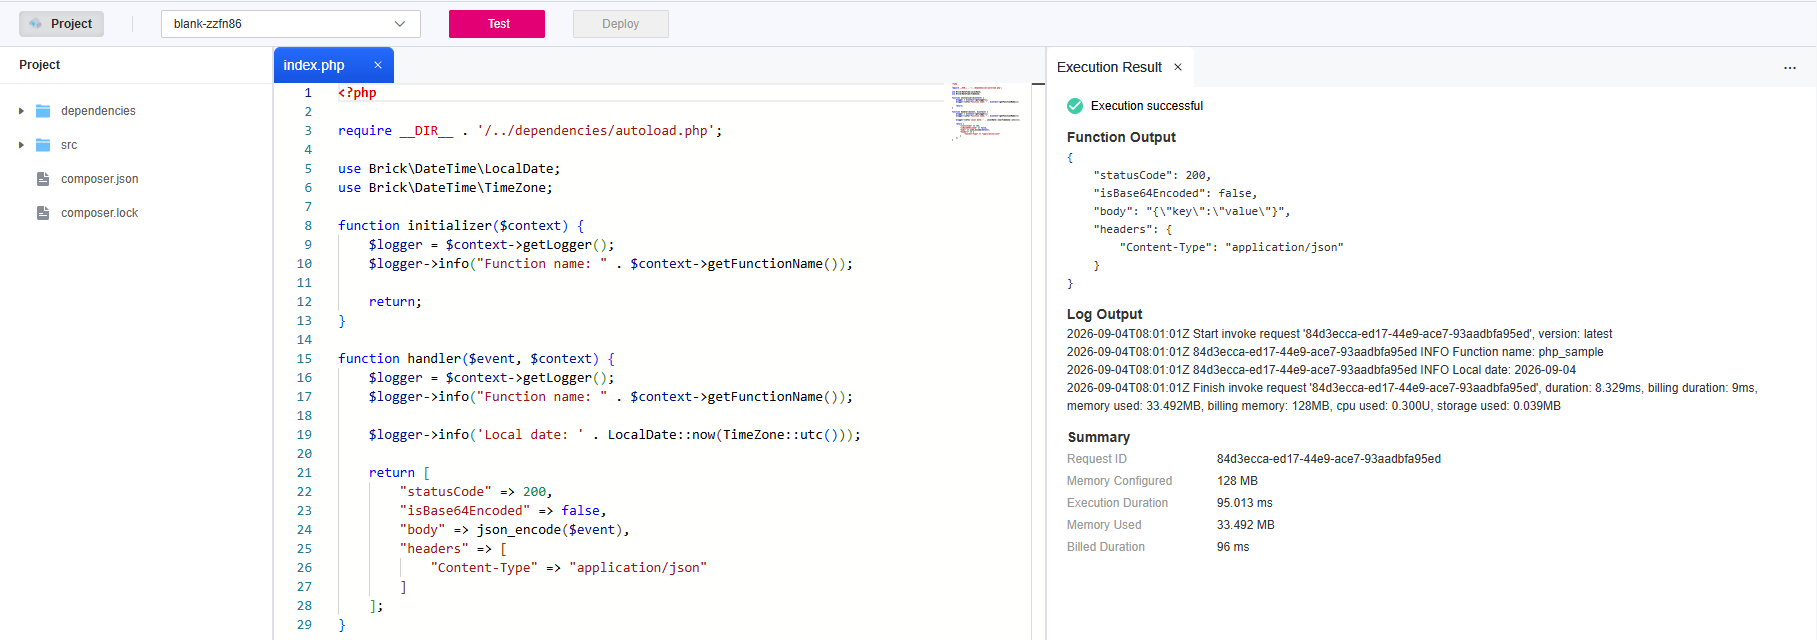
Function Execution Result Description
The execution result consists of the function output, summary, and log output.
Parameter |
Successful Execution |
Failed Execution |
|---|---|---|
Function output |
The defined function output information is returned. |
A JSON file that contains errorMessage and errorType is returned. The format is as follows: {
"errorMessage": "error message",
"errorType": "error type"
}
errorMessage: Error message returned by the runtime. errorType: Error type. |
Summary |
Request ID, Memory Configured, Execution Duration, Memory Used, and Billed Duration are displayed. |
Request ID, Memory Configured, Execution Duration, Memory Used, and Billed Duration are displayed. |
Log output |
Function logs are printed. A maximum of 4 KB logs can be displayed. |
Error information is printed. A maximum of 4 KB logs can be displayed. |