Creating an Event Function using a container image built with Python
For general details about how to use a container image to create and execute an event function, see Creating an Event Function Using a Container Image and executing the Function.
This chapter introduces how to create an image using Python and perform local verification for event functions.
Note
You need to implement an HTTP server in the image listening to port 8000 to receive requests.
Following request path is required:
POST /invoke is the function execution entry where trigger events are processed.
Following request path is optional:
POST /init is the function initialization entry where you can perform initialization operations such as loading dependencies and preparing runtime environment. This entry is optional, and you can choose to implement it based on your needs. If you do not implement this entry, FunctionGraph will directly execute the function without initialization.
Step 1: Create the Project
In this example we use the flask framework to create an HTTP server.
For full example, see: container-event-flask sample in the GitHub repository.
For details about Flask, see Flask - Python web application framework.
Initialize the project with npm:
First, create a project directory:
mkdir -p my-event-function/src
cd my-event-function
python -m venv venv
source venv/bin/activate
Then, create a requirements.txt file in the project root folder and add the following content:
Flask==3.1.3
waitress==3.0.2
Install the dependencies using pip:
python3 -m pip install -r requirements.txt
Implementing the function
Next, create two files:
src/main.py for the function entry and
src/loggingmiddleware.py for the logging middleware.
File: src/index.py
This is the main entry file for the function:
import json

from flask import Flask, request, jsonify, g

from loggingmiddleware import register_logging_middleware

# Create a Flask application instance.
app = Flask(__name__)
register_logging_middleware(app)

# Define the function initializer
@app.route('/init', methods=['POST'])
def init_post():
    # Print the request path for debugging.
    g.logger.info("***" + request.path + "***")

    # Build response data.
    data = {
        "statusCode": 200,
        "isBase64Encoded": False,
        "body": request.path + " success",
        "headers": {
            "Content-Type": "application/json"
        }
    }
    return jsonify(data)


# Define the function handler.
@app.route('/invoke', methods=['POST'])
def invoke_post():

    requestId = g.cff_request_id
    ak = request.headers.get("x-cff-security-access-key")
    sk = request.headers.get("x-cff-security-secret-key")
    st = request.headers.get("x-cff-security-token")

    token = request.headers.get("x-cff-auth-token")


    # Print the request path for debugging.
    g.logger.info("***" + request.path + "***")
    g.logger.info("***requestId: " + requestId + "***")

    # Log all incoming headers for debugging purposes.
    for header_name, header_value in request.headers.items():
        g.logger.debug(f"***header[{header_name}]: {header_value}***")

    if ak and ak != "null":
        g.logger.info("***ak: " + ak + "***")
    else:
        g.logger.error("***NO AGENCY SPECIFIED OR KEYS NOT INCLUDED ***")

    # The event is delivered as the JSON request body.
    input_event = request.get_json(silent=True) or {}

    # Build response data.
    data = {
        "statusCode": 200,
        "isBase64Encoded": False,
        "inputEvent": input_event,
        "body": request.path + " success",
        "headers": {
            "Content-Type": "application/json"
        }
    }
    return jsonify(data)

# Main program entry
if __name__ == '__main__':
    # dev server:
    #app.run(host="0.0.0.0", port=8000)

    # production server using waitress:
    from waitress import serve
    serve(app, host="0.0.0.0", port=8000)
In this code, we create a Flask application that listens on port 8000.
We define two POST endpoints:
/invoke for function execution and
/init for function initialization.
File: src/loggingmiddleware.py
The default logger implementation does not include request id and timestamp in the logs, which makes it difficult to correlate logs with specific requests.
To add request id and timestamp to the logs, we use a middleware that runs for every request.
from datetime import datetime, timezone

from flask import g, request
import os


class RequestLogger:
    def __init__(self, request_id: str):
        self.request_id = request_id

    @staticmethod
    def _timestamp() -> str:
        # Match JS toISOString style with millisecond precision and UTC marker.
        return datetime.now(timezone.utc).isoformat(timespec="milliseconds").replace("+00:00", "Z")

    log_level= os.environ.get("RUNTIME_LOG_LEVEL", "DEBUG").upper()

    def log(self, *args) -> None:
        print(f"{self._timestamp()} [LOG] [{self.request_id}]", *args, flush=True)

    def debug(self, *args) -> None:
        if self.log_level in ["DEBUG", "INFO", "WARN", "ERROR"]:
            print(f"{self._timestamp()} [DEBUG] [{self.request_id}]", *args, flush=True)

    def info(self, *args) -> None:
        if self.log_level in ["INFO", "WARN", "ERROR"]:
            print(f"{self._timestamp()} [INFO] [{self.request_id}]", *args, flush=True)

    def warn(self, *args) -> None:
        if self.log_level in ["WARN", "ERROR"]:
            print(f"{self._timestamp()} [WARN] [{self.request_id}]", *args, flush=True)

    def error(self, *args) -> None:
        if self.log_level in ["ERROR"]:
            print(f"{self._timestamp()} [ERROR] [{self.request_id}]", *args, flush=True)


def register_logging_middleware(app):
    @app.before_request
    def _before_request() -> None:
        incoming_request_id = request.headers.get("X-Cff-Request-Id")
        request_id = incoming_request_id or "no-request-id"

        # Keep request-scoped values aligned with original middleware behavior.
        g.cff_request_id = request_id
        g.logger = RequestLogger(request_id)

    @app.after_request
    def _after_request(response):
        incoming_request_id = request.headers.get("X-Cff-Request-Id")
        if incoming_request_id:
            response.headers["x-cff-request-id"] = incoming_request_id
        return response
This middleware is activated in the main.py file with following lines of code:
from loggingmiddleware import register_logging_middleware

...
register_logging_middleware(app)
...
Run and Test server from code
You can run the server directly from the code to verify that it works as expected:
python3 src/main.py
Then, you can send test requests to the server using curl or any API testing tool.
For example, to test the function execution entry, you can send a POST request to the /invoke endpoint:
curl -X POST http://localhost:8000/invoke -H "Content-Type: application/json" -d '{"key": "value"}'
You should see the response from the server indicating that the event was processed successfully.
{"body":"/invoke success","headers":{"Content-Type":"application/json"},"inputEvent":{"key":"value"},"isBase64Encoded":false,"statusCode":200}
Step 2: Build the Container Image
Create a Makefile
To simplify the development and testing process, create a Makefile in the project root folder:
SHELL:=/bin/bash
TARGET_PATH=target

CURRENT_MAKEFILE := $(firstword $(MAKEFILE_LIST))

# Docker build configuration
DOCKER_FILE=Dockerfile
IMAGE_NAME=custom_container_event_flask_python

# Terraform backend configuration
BACKEND_CONFIG_BUCKET := "doc-samples-tf-backend"
BACKEND_CONFIG_KEY := "terraform_state/python/python-container-event-flask.tf"
BACKEND_CONFIG_REGION := "eu-de"
BACKEND_CONFIG_ENDPOINTS := "endpoints={s3=\"https://obs.eu-de.otc.t-systems.com\"}"


#############################################################################################
# Docker targets
#############################################################################################

build: clean

docker_build:
  docker buildx build \
    --platform linux/amd64 \
    --file $(DOCKER_FILE) \
    --tag $(IMAGE_NAME):latest .

docker_run_local:
  docker container run \
    --rm \
    --platform linux/amd64 \
    --publish 8000:8000 \
    --user 1003:1003 \
    --name $(IMAGE_NAME) \
    $(IMAGE_NAME):latest

docker_push: docker_build
  # see: https://docs.otc.t-systems.com/software-repository-container/umn/image_management/obtaining_a_long-term_valid_login_command.html#swr-01-1000
  docker login -u $(OTC_SDK_PROJECTNAME)@$(OTC_SDK_AK) -p $(OTC_SWR_LOGIN_KEY) $(OTC_SWR_ENDPOINT)
  docker tag $(IMAGE_NAME):latest $(OTC_SWR_ENDPOINT)/$(OTC_SWR_ORGANIZATION)/$(IMAGE_NAME):latest
  docker push $(OTC_SWR_ENDPOINT)/$(OTC_SWR_ORGANIZATION)/$(IMAGE_NAME):latest

docker_all: build docker_push

clean:
  rm -rf $(TARGET_PATH)

all: build docker_build

#############################################################################################
# Terraform targets
#############################################################################################
tf_init:
  terraform -chdir=terraform \
    init \
    -backend-config=$(BACKEND_CONFIG_ENDPOINTS) \
    -backend-config="bucket=$(BACKEND_CONFIG_BUCKET)" \
    -backend-config="key=$(BACKEND_CONFIG_KEY)" \
    -backend-config="region=$(BACKEND_CONFIG_REGION)"

tf_plan:
  if [ ! -f "terraform/.terraform.lock.hcl" ]; then \
    $(MAKE) -f $(CURRENT_MAKEFILE) tf_init; \
  fi
  terraform -chdir=terraform \
    plan \
    -var-file="variables.tfvars" \
    -var="image_url=$(OTC_SWR_ENDPOINT)/$(OTC_SWR_ORGANIZATION)/$(IMAGE_NAME):latest"

tf_apply: docker_push
  if [ ! -f "terraform/.terraform.lock.hcl" ]; then \
    $(MAKE) -f $(CURRENT_MAKEFILE) tf_init; \
  fi
  terraform -chdir=terraform \
    apply -auto-approve \
    -var-file="variables.tfvars" \
    -var="image_url=$(OTC_SWR_ENDPOINT)/$(OTC_SWR_ORGANIZATION)/$(IMAGE_NAME):latest"

tf_destroy:
  terraform -chdir=terraform \
    destroy -auto-approve \
    -var-file="variables.tfvars" \
    -var="image_url=$(OTC_SWR_ENDPOINT)/$(OTC_SWR_ORGANIZATION)/$(IMAGE_NAME):latest"

#############################################################################################
# Test targets
#############################################################################################
test_local:
  # execute a curl
  curl -X POST \
  -H "X-Cff-Request-Id: $(shell uuidgen)" \
  -H "X-Cff-Func-Name: 0@default@sample-container-event-flask" \
  -H "X-Cff-Func-Version: latest" \
  -H "X-Cff-Func-Timeout: 30" \
  -H 'Content-Type: application/json' \
  -d '{"key":"Hello World of FunctionGraph"}' localhost:8000/invoke
  @echo ""

test_deployed:
  # getting Token for authentication from Username/Password...
  $(eval OTC_X_AUTH_TOKEN := $(shell ../../utils/tokenFromUsername.sh))
  # getting the Function URN from terraform output...
  $(eval MY_FUNCTION_URN := $(shell terraform -chdir=terraform output -raw MY_FUNCTION_URN))
  # calling the deployed function via FunctionGraph API...
  @curl -X POST \
   -H "Content-Type: application/json" \
   -H "x-auth-token: $(OTC_X_AUTH_TOKEN)" \
   -d '{"key":"Hello World of FunctionGraph"}' \
   https://functiongraph.$(OTC_SDK_REGION).otc.t-systems.com/v2/$(OTC_SDK_PROJECTID)/fgs/functions/$(MY_FUNCTION_URN):latest/invocations
  @echo ""
  # finished

.PHONY: build run_local docker_build docker_run_local docker_push docker_all test_local test_deployed clean tf_init tf_plan tf_apply tf_destroy
Create a Dockerfile
Create a Dockerfile in the project root folder to define the image.
Note
- In the cloud environment, UID 1003 and GID 1003 are used to start the container by default.The two IDs can be modified by choosing Configuration > Basic Settings > Container Image Overrideon the function details page. They cannot be root or a reserved ID.
- If the base image of the Alpine version is used, run the addgroup and adduser instead of groupadd and useradd commands.
You can use any base image that meets your application requirements.
Note
Ubuntu images are larger in size but come with more pre-installed libraries.
Alpine images are smaller in size but may require additional libraries depending on the application requirements.
Following example uses the Python 3.10-slim image from Docker Hub.
FROM python:3.10-slim

ENV HOME=/home/paas_user
ENV PYTHONDONTWRITEBYTECODE=1
ENV PIP_NO_CACHE_DIR=1

ENV GROUP_ID=1003
ENV GROUP_NAME=paas_user

ENV USER_ID=1003
ENV USER_NAME=paas_user

# Set timezone to UTC
ENV TZ=Etc/UTC

RUN groupadd -g ${GROUP_ID} ${GROUP_NAME} && \
    useradd -u ${USER_ID} -g ${GROUP_ID} ${USER_NAME} && \
    mkdir -p ${HOME} && \
    chown ${USER_ID}:${GROUP_ID} ${HOME} && \
    chmod 750 ${HOME}

# Copy requirements.txt
COPY --chown=${USER_ID}:${GROUP_ID} ./requirements.txt ${HOME}/requirements.txt

RUN python -m pip install --no-compile -r ${HOME}/requirements.txt

# Copy application files after dependencies for better layer caching.
COPY --chown=${USER_ID}:${GROUP_ID} ./src ${HOME}/src
COPY --chown=${USER_ID}:${GROUP_ID} ./entrypoint.sh ${HOME}/entrypoint.sh

RUN chmod 755 ${HOME}/entrypoint.sh

USER ${USER_NAME}
WORKDIR ${HOME}
EXPOSE 8000

ENTRYPOINT ["sh", "/home/paas_user/entrypoint.sh"]
Create following entrypoint script to start the server in the container:
#!/bin/sh

cd /home/paas_user/src
python3 main.py
Build and verify the image locally
1. Build the image
Build the image either using docker build or the Makefile target docker_build:
Run the following command in the project root folder to build the image:
docker buildx build \
   --platform linux/amd64 \
   --file Dockerfile \
   --tag custom_container_event_flask_python:latest .
Run the following command in the project root folder to build the image:
make docker_build
2. Run the image locally
Run the image either using docker run or the Makefile target docker_run_local:
Run the following command in the project root folder to run the image:
docker container run --rm \
  --platform linux/amd64 \
  --publish 8000:8000 \
  --name custom_container_event_flask_python \
  custom_container_event_flask_python:latest
Run the following command in the project root folder to run the image:
make docker_run_local
3. Test the image locally
Test the image either using curl or the Makefile target test_local:
Run the following command in a new terminal to test the image using a curl command:
curl -X POST -H 'Content-Type: application/json' -d '{"key":"Hello World of FunctionGraph"}' localhost:8000/invoke
Run the following command in a new terminal to test the image:
make test_local
You should see output similar to the following:
{"body":"/invoke success","headers":{"Content-Type":"application/json"},"inputEvent":{"key":"Hello World of FunctionGraph"},"isBase64Encoded":false,"statusCode":200}
Step 3: Upload the Container Image to SWR (SoftWare Repository for Container)
For details on SWR (SoftWare Repository for Container), see:
Prerequisites
SWR instance created.
Credentials for SWR created.
Upload the image to SWR
To upload the container image to SWR, following values are needed:
Parameter |
Description |
|---|---|
OTC_SDK_PROJECTNAME |
Your project name.
To obtain this, see: Obtaining a Project ID
in API usage guide but use the project name instead of the project ID.
|
OTC_SDK_AK |
Your Access Key |
OTC_SWR_LOGIN_KEY |
The login key for SWR.
For details see: Obtaining a Long-Term Docker Login Command
in the Software Repository for Container user manual.
It can be generated using the access key ${OTC_SDK_AK} and secret key ${OTC_SDK_SK} as follows:
|
OTC_SWR_ENDPOINT |
SWR endpoint, e.g. swr.eu-de.otc.t-systems.com |
OTC_SWR_ORGANIZATION |
Your SWR organization name |
IMAGE_NAME |
The name of your container image |
- Set the environment variables:
export OTC_SDK_PROJECTNAME=<your_project_name>
export OTC_SDK_AK=<your_access_key>
export OTC_SDK_SK=<your_secret_key>
export OTC_SWR_LOGIN_KEY=$(printf "${OTC_SDK_AK}" | \
        openssl dgst -binary -sha256 -hmac "${OTC_SDK_SK}" | \
        od -An -vtx1 | sed 's/[ \n]//g' | sed 'N;s/\n//')
export OTC_SWR_ENDPOINT=swr.eu-de.otc.t-systems.com
export OTC_SWR_ORGANIZATION=<your_swr_organization>
export IMAGE_NAME=custom_container_event_example
Upload the image to SWR either using shell commands or the Makefile target docker_push:
Run the following commands in the container-event-flask folder to upload the image to SWR:
docker login -u ${OTC_SDK_PROJECTNAME}@${OTC_SDK_AK} -p ${OTC_SWR_LOGIN_KEY} ${OTC_SWR_ENDPOINT}
docker tag ${IMAGE_NAME}:latest ${OTC_SWR_ENDPOINT}/${OTC_SWR_ORGANIZATION}/${IMAGE_NAME}:latest
docker push ${OTC_SWR_ENDPOINT}/${OTC_SWR_ORGANIZATION}/${IMAGE_NAME}:latest
Run the following command in the container-event folder to upload the image to SWR:
make docker_push
Step 4: Create an Event Function Using the Container Image
In the left navigation pane of the management console, choose Compute > FunctionGraph. On the FunctionGraph console, choose Functions > Function List from the navigation pane.
Click Create Function in the upper right corner. On the displayed page, select Container Image for creation mode.
Set the basic function information.
Function Type: Select Event Function.
Region: The default value is used. You can select other regions.
Regions are geographic areas isolated from each other. Resources are region-specific and cannot be used across regions through internal network connections. For low network latency and quick resource access, select the nearest region.
Function Name: Enter e.g. custom_container_event.
Enterprise Project: The default value is default. You can select the created enterprise project.
Enterprise projects let you manage cloud resources and users by project.
Agency: Select an agency with the SWR Admin permission. If no agency is available, create one by referring to Creating an Agency.
Container Image: Enter the image uploaded to SWR. The format is: {SWR_endpoint}/{organization_name}/{image_name}:{tag}.
Example: swr.eu-de.otc.t-systems.com/my_organization/custom_container_event_example:latest.
Advanced Settings: Collect Logs is disabled by default. If it is enabled, function execution logs will be reported to Log Tank Service (LTS). You will be billed for log management on a pay-per-use basis.
Parameter
Description
Log Configuration
You can select Auto or Custom.
Auto: Use the default log group and log stream. Log groups prefixed with “functiongraph.log.group” are filtered out.
Custom: Select a custom log group and log stream. Log streams that are in the same enterprise project as your function.
Log Tag
You can use these tags to filter function logs in LTS.You can add 10 more tags.Tag key/value: Enter a maximum of 64 characters.Only digits, letters, underscores (_), and hyphens (-) are allowed.After the configuration is complete, click Create Function.
See also: Step 4: Creating Function in the user manual.
Step 5: Test the Event Function
On the function details page, click Test. In the displayed dialog box, create a test event:
Select blank-template,
set Event Name to helloworld,
modify the test event as follows,
{
    "key": "Hello World of FunctionGraph"
}
and click Create.
See also: Step 5: Testing the Function in the user manual.
Step 6: View the Execution Result
Click Test and view the execution result on the right.
You should see output similar to the following:
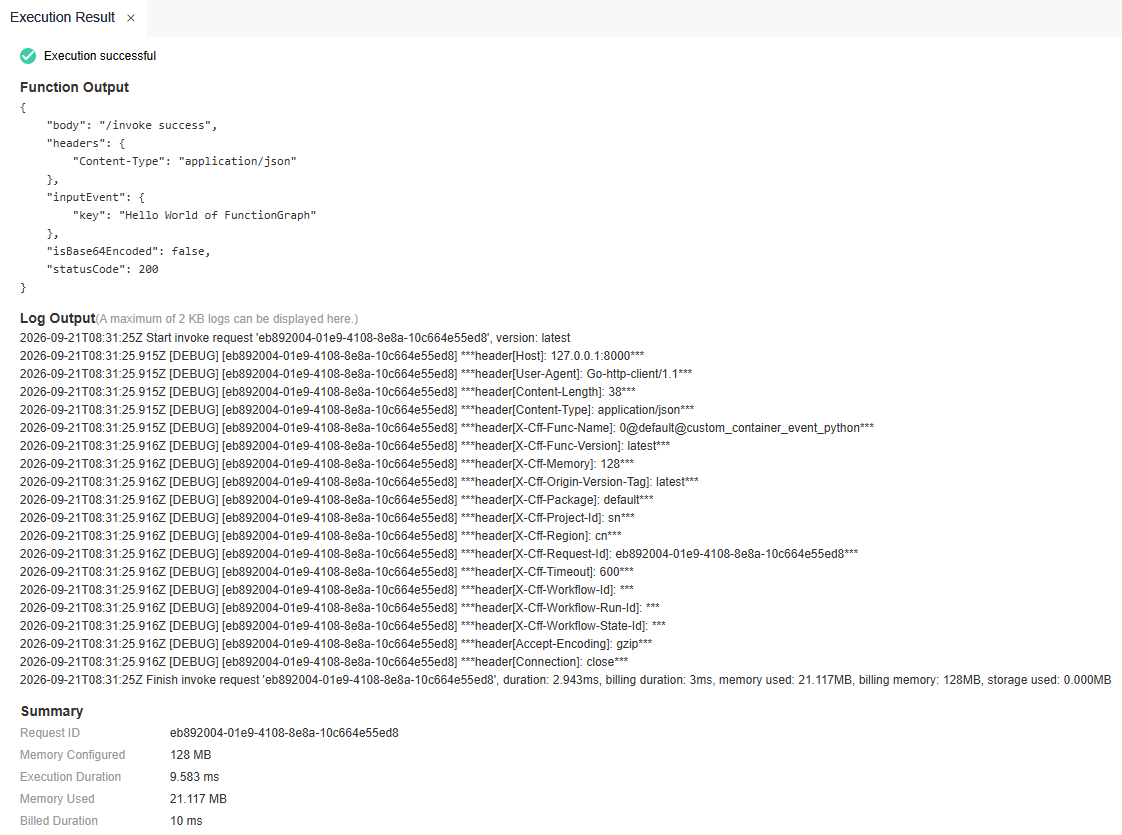
The execution result contains the following sections:
The Function Output section displays the function’s return value.
The Log Output section displays the logs generated during function execution.
Note
This page displays a maximum of 2K logs.
The Summary section displays key information from the Log.