Creating an HTTP Function Using a Container Image Built with Go
For general details about how to use a container image to create and execute an HTTP function, see Creating an HTTP Function Using a Container Image and executing the Function.
This chapter introduces how to create an image using the Go language and perform local verification for HTTP functions.
Note
You need to implement an HTTP server in the image listening to port 8000 to receive requests.
To initialize the function configuration, implement the “init()” function, which Go will execute automatically.
Constraints and Limitations
HTTP functions only support the use of APIG triggers.
Complete code can be found on Github: Container HTTP Sample
Step 1: Create the Project
In this example we use the gin framework to create an HTTP server.
For details about gin framework, see:
Create Go Module
1. Create directories for your project and navigate to it
# cretate project directory and src subdirectory
mkdir -p container-http/src
# navigate to project directory
cd container-http
2. Initialize a Go module
Run the following command to initialize a new Go module:
go mod init container-http
3. Add dependencies
Run the following commands to add the necessary dependencies:
# add gin framework
go get -u github.com/gin-gonic/gin

# add otc-functiongraph-go-runtime package for use with FunctionGraph events
go get -u github.com/opentelekomcloud-community/otc-functiongraph-go-runtime
4. Resulting go.mod
The resulting go.mod file should look like this:
module container-http

go 1.25.6

require (
  github.com/bytedance/gopkg v0.1.3 // indirect
  github.com/bytedance/sonic v1.15.0 // indirect
  github.com/bytedance/sonic/loader v0.5.0 // indirect
  github.com/cloudwego/base64x v0.1.6 // indirect
  github.com/gabriel-vasile/mimetype v1.4.12 // indirect
  github.com/gin-contrib/sse v1.1.0 // indirect
  github.com/gin-gonic/gin v1.11.0 // indirect
  github.com/go-playground/locales v0.14.1 // indirect
  github.com/go-playground/universal-translator v0.18.1 // indirect
  github.com/go-playground/validator/v10 v10.30.1 // indirect
  github.com/goccy/go-json v0.10.5 // indirect
  github.com/goccy/go-yaml v1.19.2 // indirect
  github.com/json-iterator/go v1.1.12 // indirect
  github.com/klauspost/cpuid/v2 v2.3.0 // indirect
  github.com/leodido/go-urn v1.4.0 // indirect
  github.com/mattn/go-isatty v0.0.20 // indirect
  github.com/modern-go/concurrent v0.0.0-20180306012644-bacd9c7ef1dd // indirect
  github.com/modern-go/reflect2 v1.0.2 // indirect
  github.com/opentelekomcloud-community/otc-functiongraph-go-runtime v0.0.1 // indirect
  github.com/pelletier/go-toml/v2 v2.2.4 // indirect
  github.com/quic-go/qpack v0.6.0 // indirect
  github.com/quic-go/quic-go v0.59.0 // indirect
  github.com/twitchyliquid64/golang-asm v0.15.1 // indirect
  github.com/ugorji/go/codec v1.3.1 // indirect
  go.uber.org/mock v0.6.0 // indirect
  golang.org/x/arch v0.23.0 // indirect
  golang.org/x/crypto v0.47.0 // indirect
  golang.org/x/mod v0.32.0 // indirect
  golang.org/x/net v0.49.0 // indirect
  golang.org/x/sync v0.19.0 // indirect
  golang.org/x/sys v0.40.0 // indirect
  golang.org/x/text v0.33.0 // indirect
  golang.org/x/tools v0.41.0 // indirect
  google.golang.org/protobuf v1.36.11 // indirect
)
Implement the function
Change folder to src folder:
# navigate to src directory
cd src
The FunctionGraph program implements an HTTP server to process init and invoke requests and give a response.
Create a main.go file,
import the gin dependency package,
implement a function named init() to initialize the configuration.
Go runs this function named init automatically before any other part of the package.
implement a function handler (method POST and path /index).
The following code is an example implementation of the above steps.
package main

import (
  "bytes"
  "fmt"
  "io"
  "time"

  "github.com/gin-gonic/gin" // Import the Gin framework
)

// go init function is called before main function.
func init() {
  fmt.Println("init in main.go ")
}

// Logger is a middleware function used
// to record request and response information.
func Logger() gin.HandlerFunc {

  return func(c *gin.Context) {
    logTimeFormat := "2006-01-02T15:04:05.000Z"
    start := time.Now()

    // Get the request ID from the request header.
    requestID := c.GetHeader("X-Cff-Request-Id")
    reqBody, _ := c.GetRawData()

    fmt.Printf("%s [INFO] Request:  %s %s %s %s\n", time.Now().UTC().Format(logTimeFormat), requestID, c.Request.Method,
      c.Request.RequestURI, reqBody)

    // Assign Back the request body as body can only be read once
    // by default in Gin framework.
    c.Request.Body = io.NopCloser(bytes.NewBuffer(reqBody))

    c.Next()

    end := time.Now()
    latency := end.Sub(start)
    respBody := string(rune(c.Writer.Size()))
    fmt.Printf("%s [INFO] Response: %s %s %s %s (%v)\n", time.Now().UTC().Format(logTimeFormat), requestID, c.Request.Method,
      c.Request.RequestURI, respBody, latency)
  }
}

func main() {
  // Create a Gin router.
  router := gin.New()

  // Global middleware
  router.Use(Logger())

  // Recovery middleware recovers from any panics and writes
  // a 500 if there was one.
  router.Use(gin.Recovery())

  // Registers a route for handling HTTP POST requests at the path `/index`.
  // When a client sends a
  // POST request to `/index`, the Gin framework will call
  // the `invokeIndex` function to handle the request.
  router.POST("/index", invokeIndex)

  err := router.Run(":8000") // Starts the HTTP server, listening on port 8000.
  if err != nil {
    return
  }
}
The logic to process the event is implemented in the function invokeIndex in invokeAPIG.go.
package main

import (
  "encoding/json"
  "fmt"
  "net/http"

  "github.com/gin-gonic/gin" // Import the Gin framework.
  "github.com/opentelekomcloud-community/otc-functiongraph-go-runtime/go-runtime/events/apig"
)

// invokeIndex is a handler function that processes requests
// to the POST /index route.
func invokeIndex(c *gin.Context) {
  // Read the request body.
  reqBody, _ := c.GetRawData()

  fmt.Printf("Received request body: %s\n", string(reqBody))

  var apigEvent apig.APIGTriggerEvent
  err := json.Unmarshal(reqBody, &apigEvent)
  if err != nil {
    fmt.Println("Unmarshal failed")
    c.String(http.StatusBadRequest, "invalid data")
    return
  }

  fmt.Printf("RequestId:%s\n", apigEvent.RequestContext.RequestId)

  // fill API Gateway response structure.
  returnBody := "Hello from FunctionGraph!"

  c.String(http.StatusOK, returnBody)
}
Run and Test from source code
To test the function from source code, execute in the container-http/src folder:
go run .
The server starts listening on port 8000.
You can use curl to send a test request to the function with payload from resources/apig_post_index.json using a new shell.
curl -X POST -H 'Content-Type: application/json' http://localhost:8000/index -d @./resources/apig_post_index.json
The expected response is:
{"body":"Hello from FunctionGraph!","headers":{"content-type":"application/json"},"statusCode":200,"isBase64Encoded":false}
{
  "body": "{\"name\": \"Hello World\"}",
  "requestContext": {
      "apiId": "bc1dcffd-aa35-474d-897c-d53425a4c08e",
      "requestId": "11cdcdcf33949dc6d722640a13091c77",
      "stage": "RELEASE"
  },
  "queryStringParameters": {
      "responseType": "application/json"
  },
  "httpMethod": "POST",
  "pathParameters": {},
  "headers": {
      "accept-language": "q=0.5,en-US;q=0.3,en;q=0.2",
      "accept-encoding": "gzip, deflate, br",
      "x-forwarded-port": "443",
      "x-forwarded-for": "103.218.216.98",
      "accept": "application/json",
      "upgrade-insecure-requests": "1",
      "host": "host",
      "x-forwarded-proto": "https",
      "pragma": "no-cache",
      "cache-control": "no-cache",
      "x-real-ip": "103.218.216.98",
      "user-agent": "Mozilla/5.0 (Windows NT 6.1; Win64; x64; rv:57.0) Gecko/20100101 Firefox/57.0"
  },
  "path": "/index",
  "isBase64Encoded": false
}
Create a Makefile
To simplify the development and testing process, create a Makefile in the container-http folder:
TARGET_PATH=target
#DOCKER_FILE=Dockerfile
DOCKER_FILE=Dockerfile.alpine

IMAGE_NAME=custom_container_http_example

build: clean
  mkdir -p $(TARGET_PATH)
  GOARCH=amd64 GOOS=linux CGO_ENABLED=0 && \
  cd src && \
  go build -o ../$(TARGET_PATH)/httpfunction .

run_local:
  cd $(TARGET_PATH) && ./httpfunction

docker_build: build
  docker buildx build \
    --platform linux/amd64 \
    --build-arg FILE_PATH=$(TARGET_PATH) \
    --file $(DOCKER_FILE) \
    --tag $(IMAGE_NAME):latest .

docker_run_local:
  docker container run \
    --rm \
    --platform linux/amd64 \
    --publish 8000:8000 \
    --name container_http_example \
    $(IMAGE_NAME):latest

docker_push: docker_build
  # see: https://docs.otc.t-systems.com/software-repository-container/umn/image_management/obtaining_a_long-term_valid_login_command.html#swr-01-1000
  docker login -u $(OTC_SDK_PROJECTNAME)@$(OTC_SDK_AK) -p $(OTC_SWR_LOGIN_KEY) $(OTC_SWR_ENDPOINT)
  docker tag $(IMAGE_NAME):latest $(OTC_SWR_ENDPOINT)/$(OTC_SWR_ORGANIZATION)/$(IMAGE_NAME):latest
  docker push $(OTC_SWR_ENDPOINT)/$(OTC_SWR_ORGANIZATION)/$(IMAGE_NAME):latest

docker_all: build docker_build docker_push

test_local:
  # execute a curl
  curl -X POST -H 'Content-Type: application/json' -d @./resources/apig_post_index.json http://localhost:8000/index

clean:
  rm -rf $(TARGET_PATH)

all: build docker_build

.PHONY: build run_local docker_build docker_run_local docker_push docker_all test_local clean
Build the program
Build the program either using go build or the Makefile target build:
Run the following command in the container-http folder to build the program:
# create output folder (if not already existing)
mkdir -p target

# build the program
GOARCH=amd64 GOOS=linux CGO_ENABLED=0 && cd src && go build -o ../target/httpfunction .
Run the following command in the container-http folder to build the program: .. code-block:: shell
make build
Run and Test program locally
1. Run the program locally
Run the program locally either using executable or the Makefile target run_local:
Run the following command in the container-http folder to run the compiled program:
./target/httpfunction
Run the following command in the container-http folder to run the program:
make run_local
In the terminal, you should see output similar to the following:
init in main.go
[GIN-debug] [WARNING] Creating an Engine instance with the Logger and Recovery middleware already attached.

[GIN-debug] [WARNING] Running in "debug" mode. Switch to "release" mode in production.
- using env:   export GIN_MODE=release
- using code:  gin.SetMode(gin.ReleaseMode)

[GIN-debug] POST   /index                    --> main.invokeIndex (4 handlers)
[GIN-debug] [WARNING] You trusted all proxies, this is NOT safe. We recommend you to set a value.
Please check https://github.com/gin-gonic/gin/blob/master/docs/doc.md#dont-trust-all-proxies for details.
[GIN-debug] Listening and serving HTTP on :8000
2. Test the program locally
Test the program locally either using curl or the Makefile target test_local:
Run the following command in a new terminal to test the program using a curl command:
curl -X POST -H 'Content-Type: application/json' -d @./resources/apig_post_index.json localhost:8000/index
Run the following command in a new terminal to test the program using the Makefile target “test_local”:
make test_local
You should see output similar to the following:
{"body":"Hello from FunctionGraph!","headers":{"content-type":"application/json"},"statusCode":200,"isBase64Encoded":false}
Step 2: Build the Container Image
Create a Dockerfile
Create a Dockerfile in the container-http folder to define the image.
Note
- In the cloud environment, UID 1003 and GID 1003 are used to start the container by default.The two IDs can be modified by choosing Configuration > Basic Settings > Container Image Overrideon the function details page. They cannot be root or a reserved ID.
- If the base image of the Alpine version is used, run the addgroup and adduser instead of groupadd and useradd commands.
You an use any base image that meets your application requirements.
Following are two example Dockerfiles, one using Ubuntu base image and another using Alpine base image.
Note
Ubuntu images are larger in size but come with more pre-installed libraries.
Alpine images are smaller in size but may require additional libraries depending on the application requirements.
Example Dockerfile using Ubuntu base image:
# Example Dockerfile for OTC FunctionGraph Container Event Function
# using Ubuntu base image
FROM amd64/ubuntu:22.04

# set environment variables
ENV HOME=/home/paas

ENV GROUP_ID=1003
ENV GROUP_NAME=paas_user

ENV USER_ID=1003
ENV USER_NAME=paas_user

# create non root user and home directory
RUN mkdir -m 550 ${HOME} && \
   # add group and user with specific IDs
   groupadd -g ${GROUP_ID} ${GROUP_NAME} && \
   # add user with specific UID and GID
   useradd -u ${USER_ID} -g ${GROUP_ID} ${USER_NAME}

# copy content of target folder
ADD ./target ${HOME}

# adjust permissions
RUN chown -R ${USER_ID}:${GROUP_ID} ${HOME} && \
    chmod -R 775 ${HOME}

# switch to non root user
USER ${USER_NAME}

# switch to working directory
WORKDIR ${HOME}

# expose port and entrypoint
# FunctionGraph invokes container event function through port 8000
EXPOSE 8000

ENTRYPOINT ["/home/paas/httpfunction"]
Example Dockerfile using Alpine base image:
# Example Dockerfile for OTC FunctionGraph Container Event Function
# using Alpine base image
# use digest to speed up build and ensure immutability
FROM amd64/alpine:3.23@sha256:1882fa4569e0c591ea092d3766c4893e19b8901a8e649de7067188aba3cc0679

# set environment variables
ENV HOME=/home/paas

ENV GROUP_ID=1003
ENV GROUP_NAME=paas_user

ENV USER_ID=1003
ENV USER_NAME=paas_user

# adjust for alpine base image

RUN mkdir --mode 550 --parents ${HOME} && \
    # add group with specific GID
    addgroup -g ${GROUP_ID} ${GROUP_NAME} && \
    # add user with specific UID and GID
    adduser -u ${USER_ID} -G ${GROUP_NAME} -D ${USER_NAME}

# copy content of target folder
ADD ./target ${HOME}

# adjust permissions
RUN chown -R ${USER_ID}:${GROUP_ID} ${HOME} && \
    chmod -R 775 ${HOME}

# switch to non root user
USER ${USER_NAME}

# switch to working directory
WORKDIR ${HOME}

# expose port and entrypoint
# FunctionGraph invokes container event function through port 8000
EXPOSE 8000

ENTRYPOINT ["/home/paas/httpfunction"]
Build and verify the image locally
1. Build the image
Build the image either using docker build or the Makefile target docker_build:
Run the following command in the container-http folder to build the image:
docker buildx build \
   --platform linux/amd64 \
   --build-arg FILE_PATH=target \
   --file Dockerfile \
   --tag custom_container_http_example:latest .
Note
Replace Dockerfile with Dockerfile.alpine in the above command to build the image using the Alpine base image.
Run the following command in the container-http folder to build the image:
make docker_build
Note
The Makefile is set to use Dockerfile by default.
To build the image using the Alpine base image, modify the DOCKER_FILE variable in the Makefile to point to Dockerfile.alpine.
2. Run the image locally
Run the image either using docker run or the Makefile target docker_run_local:
Run the following command in the container-http folder to run the image:
docker container run --rm \
  --platform linux/amd64 \
  --publish 8000:8000 \
  --name container_http_example \
  custom_container_http_example:latest
Run the following command in the container-http folder to run the image:
make docker_run_local
3. Test the image locally
Test the image either using curl or the Makefile target test_local:
Run the following command in a new terminal to test the image using a curl command:
curl -X POST -H 'Content-Type: application/json' -d @./resources/apig_post_index.json localhost:8000/invoke
Run the following command in a new terminal to test the image:
make test_local
You should see output similar to the following:
{"body":"Hello from FunctionGraph!","headers":{"content-type":"application/json"},"statusCode":200,"isBase64Encoded":false}
Step 3: Upload the Container Image to SWR (SoftWare Repository for Container)
For details on SWR (SoftWare Repository for Container), see:
Prerequisites
SWR instance created. For more information, see Creating a Software Repository for Container.
Credentials for SWR created. For more information, see Creating Access Credentials.
Upload the image to SWR
To upload the container image to SWR, following values are needed:
Parameter |
Description |
|---|---|
OTC_SDK_PROJECTNAME |
Your project name.
To obtain this, see: Obtaining a Project ID
in API usage guide but use the project name instead of the project ID.
|
OTC_SDK_AK |
Your Access Key |
OTC_SWR_LOGIN_KEY |
The login key for SWR.
For details see: Obtaining a Long-Term Docker Login Command
in the Software Repository for Container user manual.
It can be generated using the access key ${OTC_SDK_AK} and secret key ${OTC_SDK_SK} as follows:
|
OTC_SWR_ENDPOINT |
SWR endpoint, e.g. swr.eu-de.otc.t-systems.com |
OTC_SWR_ORGANIZATION |
Your SWR organization name |
IMAGE_NAME |
The name of your container image |
- Set the environment variables:
export OTC_SDK_PROJECTNAME=<your_project_name>
export OTC_SDK_AK=<your_access_key>
export OTC_SDK_SK=<your_secret_key>
export OTC_SWR_LOGIN_KEY=$(printf "${OTC_SDK_AK}" | \
        openssl dgst -binary -sha256 -hmac "${OTC_SDK_SK}" | \
        od -An -vtx1 | sed 's/[ \n]//g' | sed 'N;s/\n//')
export OTC_SWR_ENDPOINT=swr.eu-de.otc.t-systems.com
export OTC_SWR_ORGANIZATION=<your_swr_organization>
export IMAGE_NAME=custom_container_http_example
Upload the image to SWR either using shell commands or the Makefile target docker_push:
Run the following commands in the container-http folder to upload the image to SWR:
docker login -u $(OTC_SDK_PROJECTNAME)@$(OTC_SDK_AK) -p $(OTC_SWR_LOGIN_KEY) ${OTC_SWR_ENDPOINT}
docker tag $(IMAGE_NAME):latest ${OTC_SWR_ENDPOINT}/$(OTC_SWR_ORGANIZATION)/$(IMAGE_NAME):latest
docker push ${OTC_SWR_ENDPOINT}/$(OTC_SWR_ORGANIZATION)/$(IMAGE_NAME):latest
Run the following command in the container-http folder to upload the image to SWR:
make docker_push
Step 4: Create the HTTP Function in FunctionGraph Using the Container Image
In the left navigation pane of the management console, choose Compute > FunctionGraph. On the FunctionGraph console, choose Functions > Function List from the navigation pane.
Click Create Function in the upper right corner. On the displayed page, select Container Image for creation mode.
Set the basic function information.
Function Type: Select HTTP Function.
Region: The default value is used. You can select other regions.
Regions are geographic areas isolated from each other. Resources are region-specific and cannot be used across regions through internal network connections. For low network latency and quick resource access, select the nearest region.
Function Name: Enter e.g. custom_container_http.
Enterprise Project: The default value is default. You can select the created enterprise project.
Enterprise projects let you manage cloud resources and users by project.
Agency: Select an agency with the SWR Admin permission. If no agency is available, create one by referring to Creating an Agency.
Container Image: Enter the image uploaded to SWR. The format is: {SWR_endpoint}/{organization_name}/{image_name}:{tag}.
Example: swr.eu-de.otc.t-systems.com/my_organization/custom_container_http_example:latest.
Advanced Settings: Collect Logs is disabled by default. If it is enabled, function execution logs will be reported to Log Tank Service (LTS). You will be billed for log management on a pay-per-use basis.
Parameter
Description
Log Configuration
You can select Auto or Custom.
Auto: Use the default log group and log stream. Log groups prefixed with “functiongraph.log.group” are filtered out.
Custom: Select a custom log group and log stream. Log streams that are in the same enterprise project as your function.
Log Tag
You can use these tags to filter function logs in LTS.You can add 10 more tags.Tag key/value: Enter a maximum of 64 characters.Only digits, letters, underscores (_), and hyphens (-) are allowed.After the configuration is complete, click Create Function.
See also: Step 4: Creating Function in the user manual.
Step 5: Test the HTTP Function
On the function details page, click Test. In the displayed dialog box, create a test event:
Select API Gateway (Dedicated) (only available option),
set Event Name to helloworld,
modify the test event as follows,
apig_post_index.json¶{ "body": "{\"name\": \"Hello World\"}", "requestContext": { "apiId": "bc1dcffd-aa35-474d-897c-d53425a4c08e", "requestId": "11cdcdcf33949dc6d722640a13091c77", "stage": "RELEASE" }, "queryStringParameters": { "responseType": "application/json" }, "httpMethod": "POST", "pathParameters": {}, "headers": { "accept-language": "q=0.5,en-US;q=0.3,en;q=0.2", "accept-encoding": "gzip, deflate, br", "x-forwarded-port": "443", "x-forwarded-for": "103.218.216.98", "accept": "application/json", "upgrade-insecure-requests": "1", "host": "host", "x-forwarded-proto": "https", "pragma": "no-cache", "cache-control": "no-cache", "x-real-ip": "103.218.216.98", "user-agent": "Mozilla/5.0 (Windows NT 6.1; Win64; x64; rv:57.0) Gecko/20100101 Firefox/57.0" }, "path": "/index", "isBase64Encoded": false }Note
Make sure to modify the payload send as body to your FunctionGraph accordingly. The Test function in FunctionGraph console uses these settings to call your function:
path: set to the path defined in your function (e.g. /index),
httpMethod: set to the method defined in your function (e.g. POST),
accept header: set to application/json,
responseType parameter in queryStringParameters to application/json to get the expected response.
and click Create.
See also: Step 5: Test the Function in the user manual.
Step 6: View the Execution Result
Click Test and view the execution result on the right.
You should see output similar to the following:
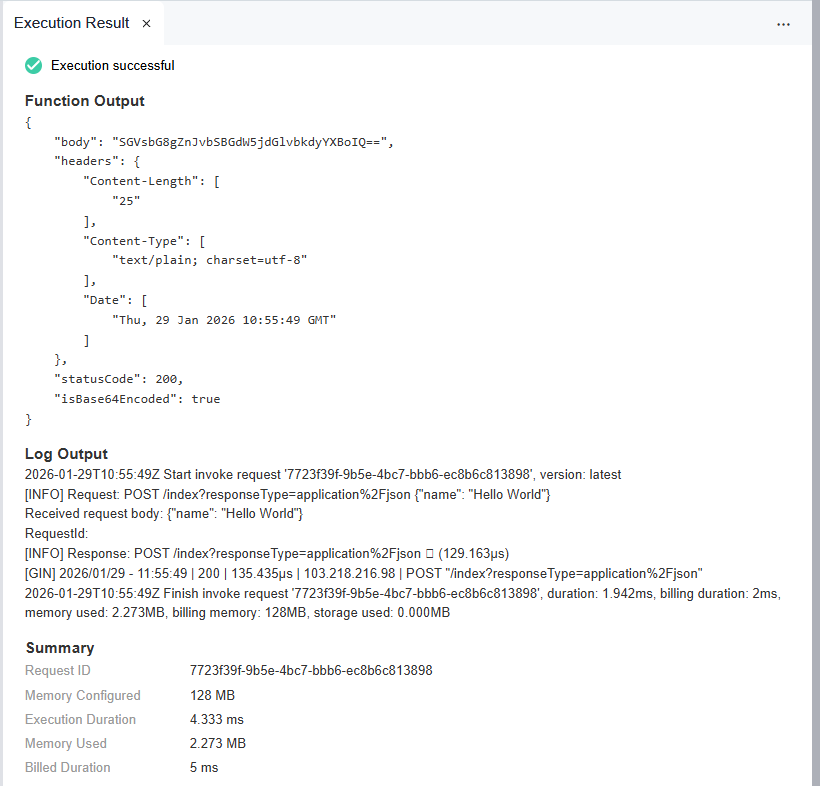
The execution result contains the following sections:
The Function Output section displays the function’s return value.
The response returned by FunctionGraph a Json object of Type apig.APIGTriggerResponse.
The body field contains the base64 encoded response body:
SGVsbG8gZnJvbSBGdW5jdGlvbkdyYXBoIQ==
To decode the response body, use the following command:
echo "SGVsbG8gZnJvbSBGdW5jdGlvbkdyYXBoIQ==" | base64 --decode
The decoded response body is:
Hello from FunctionGraph!
The Log Output section displays the logs generated during function execution.
Note
This page displays a maximum of 2K logs.
The Summary section displays key information from the Log.
Deploy the HTTP Function using Terraform
For details on how to deploy using Terraform, see Deploying an HTTP Function container Image using Terraform.