Creating an HTTP Functions with Go from scratch
Introduction
For general details about creating HTTP functions from scratch and execute an HTTP function, see Creating a Function from Scratch and Executing the Function in the user manual.
This chapter describes how to create a FunctionGraph HTTP function using Go language and perform local verification.
HTTP functions do not support direct code deployment using Go in web console.
This section uses binary conversion as an example to describe how to deploy Go programs on FunctionGraph.
Note
You need to implement an HTTP server in the image listening to port 8000 to receive requests.
To initialize the function configuration, implement the “init()” function can be used, which Go will execute automatically.
Constraints and Limitations
Additional to the constraints mentioned in General Constraints for HTTP Functions, following constraints apply when building Go HTTP functions from scratch:
- The handler must be set in the bootstrap file.The bootstrap file is the startup file of the HTTP function.The HTTP function can only read bootstrap as the startup file name.If the file name is not bootstrap, the service cannot be started.
bootstrap file
The bootstrap file must be in the root directory of the deployment package.
Example of bootstrap file for project named myHttpFunction
/opt/function/code/myHttpFunction
Step 1: Create the Project
This sample uses the go-restful framework to implement the HTTP function.
Complete code for this sample can be found on Github: samples-doc/scratch-http.
Create Go Module
1. Create directories for your project and navigate to it
# create project directory and src subdirectory
mkdir -p scratch-http/src
# navigate to project directory
cd scratch-http
2. Initialize a Go module
Run the following command to initialize a new Go module:
go mod init scratch-http
3. Add dependencies
Run the following commands to add the necessary dependencies:
# add go-restful framework
go get -u github.com/emicklei/go-restful
4. Resulting go.mod
The resulting go.mod file should look like this:
Implement the function
Change folder to src folder:
# navigate to src directory
cd src
Create the source file main.go. The code is as follows:
// main.go
package main

import (
	"fmt"
	"net/http"

	"io"

	"github.com/emicklei/go-restful"
)

// PostHello handles HTTP POST requests
func PostHello(req *restful.Request, resp *restful.Response) {
	var body []byte
	body, err := io.ReadAll(req.Request.Body)
	if err != nil {
		fmt.Println("Read body failed")
		resp.WriteHeader(http.StatusBadRequest)
		return
	}

	var requestId string = req.HeaderParameter("X-CFF-Request-Id")

	req.ReadEntity(&body)
	fmt.Printf("Received request [%s] body: %s\n", requestId, string(body))

	resp.Write([]byte("Hello from Go HTTP Function! Your request ID is: " + requestId + "\n"))
}

// GetHello handles HTTP GET requests
func GetHello(req *restful.Request, resp *restful.Response) {
	var requestId string = req.HeaderParameter("X-CFF-Request-Id")
	fmt.Printf("GET request [%s]\n", requestId)

	resp.Write([]byte("Hello from Go HTTP Function GET! Your request ID is: " + requestId + "\n"))
}

// registerServer sets up the HTTP server and routes
func registerServer() {
	fmt.Println("Running a Go Http server at localhost:8000/")

	ws := new(restful.WebService)
	ws.Path("/")

	ws.Route(ws.POST("/hello").To(PostHello))

	ws.Route(ws.GET("/hello").To(GetHello))

	c := restful.DefaultContainer
	c.Add(ws)
	fmt.Println(http.ListenAndServe(":8000", c))
}

// main function
func main() {
	registerServer()
}
Run and Test from source code
To test the function from source code, execute in the container-http/src folder:
go run .
The server starts listening on port 8000.
You can use curl to send a test request to the function using a new shell.
curl -X POST -H 'Content-Type: application/json' \
  -d 'nice to meet you local' \
  http://localhost:8000/hello
The expected response is:
Hello from Go HTTP Function! Your request ID is:
Step 2: Compiling and packaging
To ease building and packaging, create a Makefile in the project root directory like the following:
HANDLER_NAME=go-http-demo

build:
	GOARCH=amd64 GOOS=linux CGO_ENABLED=0 go build -o target/$(HANDLER_NAME) src/main.go

zip:
	# Create bootstrap file pointing to the handler binary
	@echo "/opt/function/code/$(HANDLER_NAME)" > target/bootstrap

	# Zip all files in target directory
	cd target && zip -r ../deploy.zip .

clean:
	rm -f deploy.zip
	rm -rf target

test_local_post:
	@curl -X POST \
	-H 'Content-Type: application/json' \
	-d 'nice to meet you local' \
	http://localhost:8000/hello

test_local_get:
	@curl -X GET \
	http://localhost:8000/hello

all: clean build zip

.PHONY: build zip clean all test_local_post test_local_get
The Makefile automates the build process for your Go FunctionGraph HTTP function.
You can run the make build command in the project root directory to compile your function code and generate the executable file named go-http-demo in the target directory.
The make zip command creates a deployment package named deploy.zip that contains the executable file and a bootstrap file.
The bootstrap file is required by FunctionGraph to identify the entry file of the function.
/opt/function/code/go-http-demo
To ease building and packaging, create a build.cmd file in the project root directory like the following:
rem #############################################################
rem # Build script for Golang HTTP Function
rem # for Linux target on Windows
rem #############################################################

rem set visibility of environment changes to local only
SETLOCAL

rem Set the following parameters to the corresponding value of Linux
set GOARCH=amd64
set GOOS=linux
set CGO_ENABLED=0
set GO111MODULE=on

rem set handler name
set HANDLER_NAME=go-http-demo

rem create target_win folder if not exists
if not exist "target_win" md "target_win"

rem build the Go HTTP function in target_win folder
go build -o target_win/%HANDLER_NAME% src/main.go

rem create bootstrap file in target_win folder
echo /opt/function/code/%HANDLER_NAME% > .\target_win\bootstrap

rem package the target_win folder to a zip file
tar.exe -c -a -f go-http-demo.zip -C target_win *
Run the build.cmd script in the project root directory to compile your function code and generate the executable file named go-http-demo and the bootstrap file in the target_win directory.
The bootstrap file is required by FunctionGraph to identify the entry file of the function.
bootstrap file¶/opt/function/code/go-http-demo
The script also creates a deployment package named go-http-demo.zip in the project root directory using the Windows tar.exe command.
Step 3: Create FunctionGraph HTTP Function
In the left navigation pane of the management console, choose Compute > FunctionGraph. On the FunctionGraph console, choose Functions > Function List from the navigation pane.
Click Create Function in the upper right corner. On the displayed page, select Create from scratch for creation mode.
Set the basic function information.
Function Type: Select HTTP Function.
Region: The default value is used. You can select other regions.
Regions are geographic areas isolated from each other. Resources are region-specific and cannot be used across regions through internal network connections. For low network latency and quick resource access, select the nearest region.
Function Name: Enter e.g. MyGoHttpFunction.
Enterprise Project: The default value is default. You can select the created enterprise project.
Enterprise projects let you manage cloud resources and users by project.
Agency: None
Runtime: Select Go 1.x.
Advanced Settings:
Collect Logs is disabled by default. If it is enabled, function execution logs will be reported to Log Tank Service (LTS). You will be billed for log management on a pay-per-use basis.
Parameter
Description
Log Configuration
You can select Auto or Custom.
Auto: Use the default log group and log stream. Log groups prefixed with “functiongraph.log.group” are filtered out.
Custom: Select a custom log group and log stream. Log streams that are in the same enterprise project as your function.
Log Tag
After the configuration is complete, click Create Function.
After the function is created, deploy the function code by upload the deploy.zip if created on Linux or the go-http-demo.zip package if created on Windows using the Upload Code / Upload local Zip feature in the Code Source section.
For details, see Creating an HTTP Function
Step 4: Test using console
To test using console you have to create a test event in the same structure as an API Gateway would send the request to the function.
Create the test event using FunctionGraph console, in Code section, select Configure Test Event and click Test.
In the displayed dialog box, create a test event:
Select API Gateway (Dedicated) (only available option),
set Event Name to helloworld,
modify the test event as follows:
{
    "body": "bmljZSB0byBtZWV0IHlvdQ==",
    "requestContext": {
        "apiId": "bc1dcffd-aa35-474d-897c-d53425a4c08e",
        "requestId": "11cdcdcf33949dc6d722640a13091c77",
        "stage": "RELEASE"
    },
    "queryStringParameters": {
        "responseType": "html"
    },
    "httpMethod": "POST",
    "pathParameters": {},
    "headers": {
        "accept-language": "q=0.5,en-US;q=0.3,en;q=0.2",
        "accept-encoding": "gzip, deflate, br",
        "x-forwarded-port": "443",
        "x-forwarded-for": "103.218.216.98",
        "accept": "text/html,application/xhtml+xml,application/xml;q=0.9,*/*;q=0.8",
        "upgrade-insecure-requests": "1",
        "host": "host",
        "x-forwarded-proto": "https",
        "pragma": "no-cache",
        "cache-control": "no-cache",
        "x-real-ip": "103.218.216.98",
        "user-agent": "Mozilla/5.0 (Windows NT 6.1; Win64; x64; rv:57.0) Gecko/20100101 Firefox/57.0"
    },
    "path": "/hello",
    "isBase64Encoded": true
}
The preceding example test event simulates:
an HTTP POST request (Parameter httpMethod)
to the /hello API Endpoint of the HTTP function (Parameter path)
with the request body bmljZSB0byBtZWV0IHlvdQ== (Parameter body) as base64 encoding string nice to meet you
and base64 encoding indicator set to true (Parameter isBase64Encoded).
and click Create.
See also: Step 5: Test the Function in the user manual.
Step 5: View the Execution Result
Click Test and view the Execution Result on the right.
The execution result contains the following sections:
The Function Output section displays the function’s return value.
The response returned by FunctionGraph a Json object of Type apig.APIGTriggerResponse.
{
    "body": "SGVsbG8gZnJvbSBHbyBIVFRQIEZ1bmN0aW9uISBZb3VyIHJlcXVlc3QgSUQgaXM6IDAxZTNhNGFkLWNlN2MtNDk1Ni1iMmVkLWM1YjQ0MGIyM2FjOQo=",
    "headers": {
        "Content-Length": [
            "86"
        ],
        "Content-Type": [
            "text/plain; charset=utf-8"
        ],
        "Date": [
            "Tue, 03 Feb 2026 14:08:31 GMT"
        ]
    },
    "statusCode": 200,
    "isBase64Encoded": true
}
The body field contains the Base64-encoded string of:
Hello from Go HTTP Function! Your request ID is: 01e3a4ad-ce7c-4956-b2ed-c5b440b23ac0.The statusCode field indicates that the request is processed successfully and
isBase64Encoded indicates that the body is encoded using Base64.
The Log Output section displays the logs generated during function execution.
Note
This page displays a maximum of 2K logs.
The Summary section displays key information from the Log.
Step 6: Creating an APIG (Dedicated) trigger
Create an APIG (dedicated) trigger by referring to Step 7: Configure the trigger information in the user guide.
Set following parameters:
Parameter |
Description |
|---|---|
Trigger Type |
API Gateway (Dedicated) |
API instance |
Create a new API instance or select an existing API instance. |
API Name |
e.g. MyGoHttpAPI |
API Group |
Create a new API group or select an existing API group. |
Environment |
RELEASE |
Security Authentication |
None for debugging |
Protocol |
HTTPS |
Method |
ANY |
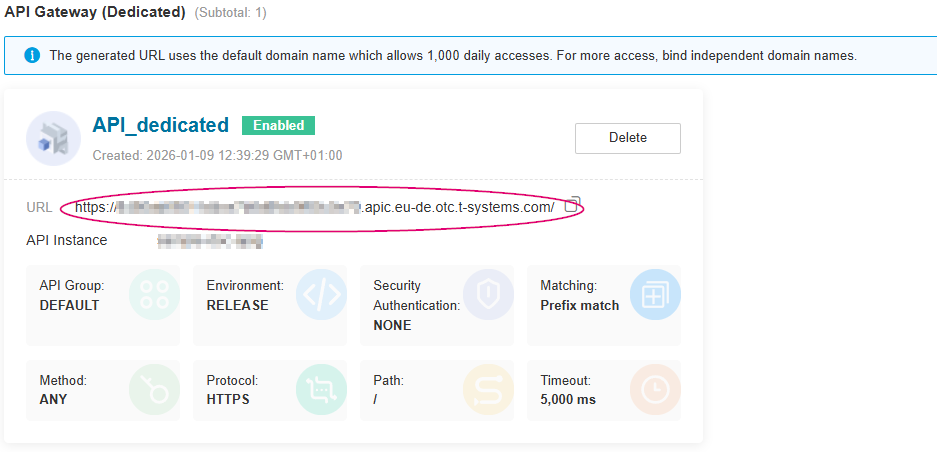
The API_GATEWAY_TRIGGER_URL is displayed after the trigger is created.
See the following figure:
Step 7: Test using APIG trigger
Test using browser
Copy the URL of the APIG trigger and add /hello to the address box of the browser.
This will test the HTTP function using an HTTP GET request.
The following information is displayed:

Result in browser
Test using curl
To test the function using curl and the HTTP POST method, replace ${API_GATEWAY_TRIGGER_URL} (see Step 6: Creating an APIG (Dedicated) trigger) with the URL of your APIG trigger and run the following command:
curl -X POST -H 'Content-Type: application/json' \
  -d 'nice to meet you' \
  ${API_GATEWAY_TRIGGER_URL}/hello
The expected response is:
Hello from Go HTTP Function! Your request ID is: e0ccd18b-d365-4f31-a9de-3557ddbbeade
Deploy the HTTP Function using Terraform
For details on how to deploy using Terraform, see Deploying a HTTP Function using Terraform.